

Are you tired of staring at those ugly, outdated popcorn ceilings? It’s time for a change! A smooth, white ceiling can instantly modernize your home and give it a fresh, updated look. In this blog post, we’ll cover everything you need to know about popcorn ceilings – from their history to the downsides they come with. We’ll also provide essential tips on how to safely test for asbestos, prepare for removal, and even DIY the project yourself. If you’re not up for the challenge, we’ll explore alternatives such as hiring a professional or covering up the popcorn texture. Say goodbye to your outdated popcorn ceilings and hello to a sleek new look!
The Appeal of a Smooth Ceiling
After the popcorn removal Smooth ceilings offer any room a modern and clean look, creating a sleek finish that replaces outdated popcorn textures. The smooth surface reflects light, making the space feel brighter and more spacious. By updating your home with a smooth ceiling, you can achieve a fresh and contemporary aesthetic that is a blank canvas for any decorating style. Whether you’re going for a minimalist look or a bold design, a smooth ceiling provides the perfect backdrop. It’s an appealing DIY project that can be accomplished with the right tools and materials.
Opening Your Space with a Flat White Ceiling
Looking to make your space feel larger and more open? Consider opening your space with a flat white ceiling. By opting for a minimalist design with a simple, flat white ceiling, you can create the illusion of higher ceilings, making the room feel more expansive. Not only does a white ceiling brighten up the space, but it also creates a cohesive look throughout the entire room. Say goodbye to textured popcorn ceilings and transform your space with a smooth, flat surface. Embrace the airy and open atmosphere that a flat white ceiling provides.
Understanding Popcorn Ceilings: A Brief History
Popcorn ceilings, once popular in the mid-20th century, were known for their acoustic properties and ability to reduce echo and noise in a room. Originally, they were used to hide imperfections in ceiling surfaces. Mixing paint or joint compound with small Styrofoam particles achieved the signature textured look. However, as smooth ceilings have become more desired, the trend of textured popcorn ceilings has faded. Today, many homeowners opt for a sleek and modern look with smooth ceilings. Understanding the history of popcorn ceilings helps us appreciate the transition to a more contemporary aesthetic.
Why it’s Time for a Change: The Downsides of Popcorn Ceilings
Popcorn ceilings may seem convenient and cost-effective, but they come with their fair share of downsides. One major drawback is the accumulation of dust, which can make cleaning and maintenance challenging. The rough texture of popcorn ceilings also creates shadows, making the room appear darker than it is. Additionally, these ceilings are prone to cracking and chipping, requiring frequent repairs. Removing popcorn ceilings can increase the value of your home and attract potential buyers who find this outdated aesthetic unappealing. Consider the drawbacks before deciding to keep your textured ceiling.
Assessing Your Ceiling: Can You DIY the Removal?
Before attempting to remove your popcorn ceiling, it’s important to assess whether you can DIY the project. Test for asbestos, consider the size and condition of your ceiling, check if you have the necessary tools, and research different DIY methods. Make sure you’re comfortable tackling the project before getting started.
Factors to Consider Before Beginning the Project
Before you dive into removing popcorn ceilings, there are a few key factors to consider. First and foremost, be prepared for the time and effort it will take. Removing popcorn texture can be labor-intensive, so make sure you have the necessary resources and patience. Additionally, be mindful of the potential mess that comes with this project. Dust and debris will be generated, so take precautions to protect your space. Another crucial consideration is whether hiring a professional contractor may be a more efficient and cost-effective option for you. Research local regulations, as some areas may have restrictions or require permits for popcorn ceiling removal. Lastly, evaluate the condition of your ceiling surface as removal may reveal underlying issues that need to be addressed. By considering these factors, you’ll be better equipped to tackle this DIY project effectively.
How to Safely Test for Asbestos in Your Popcorn Ceiling
When it comes to testing for asbestos in your popcorn ceiling, safety should be your top priority. Follow proper precautions by wearing gloves, a mask, and protective clothing throughout the process. To collect samples of your ceiling texture, use an asbestos test kit readily available at hardware stores. It’s essential to send these samples to a certified asbestos testing lab to ensure accurate results. If asbestos is detected, consult with professionals for safe removal and disposal of the popcorn ceiling. Remember, prioritizing your health and safety by taking asbestos testing seriously is crucial before proceeding with any removal process.
How to Prepare for Popcorn Ceiling Removal
Preparing for the removal of popcorn ceilings is essential to ensure a smooth and successful DIY project. Start by clearing the area of furniture, decorations, and other items to protect them from dust and debris. Use plastic sheeting or drop cloths to cover floors, walls, and furniture, creating a paint barrier and preventing falling texture from reaching unwanted areas. Secure the plastic sheeting with painter’s tape, ensuring a tight seal to contain dust. Remember to turn off ceiling fans and cover light fixtures to prevent damage. Consider removing or covering kitchen cabinets, crown molding, and other features that may impede the removal process.
Protecting Your Space: Essential Steps Pre-Removal
To ensure a smooth and safe removal process for your popcorn ceiling, there are a few essential steps you should take to protect your space. Begin by turning off the power to the room and taping plastic sheeting over electrical outlets and switches for added protection. Use painter’s tape to secure plastic sheeting to the walls, creating a barrier between the popcorn ceiling and surrounding surfaces. Make sure all doors and windows are closed to prevent dust from spreading to other areas of your home. To safeguard the paint during removal, lay plastic sheeting or painter’s tape along the ceiling/wall joint. Lastly, consider wearing protective clothing, goggles, and a mask to shield yourself from dust and debris.
A Step-by-Step Guide to Removing Your Popcorn Ceiling
A Step-by-Step Guide to Removing Your Popcorn Ceiling
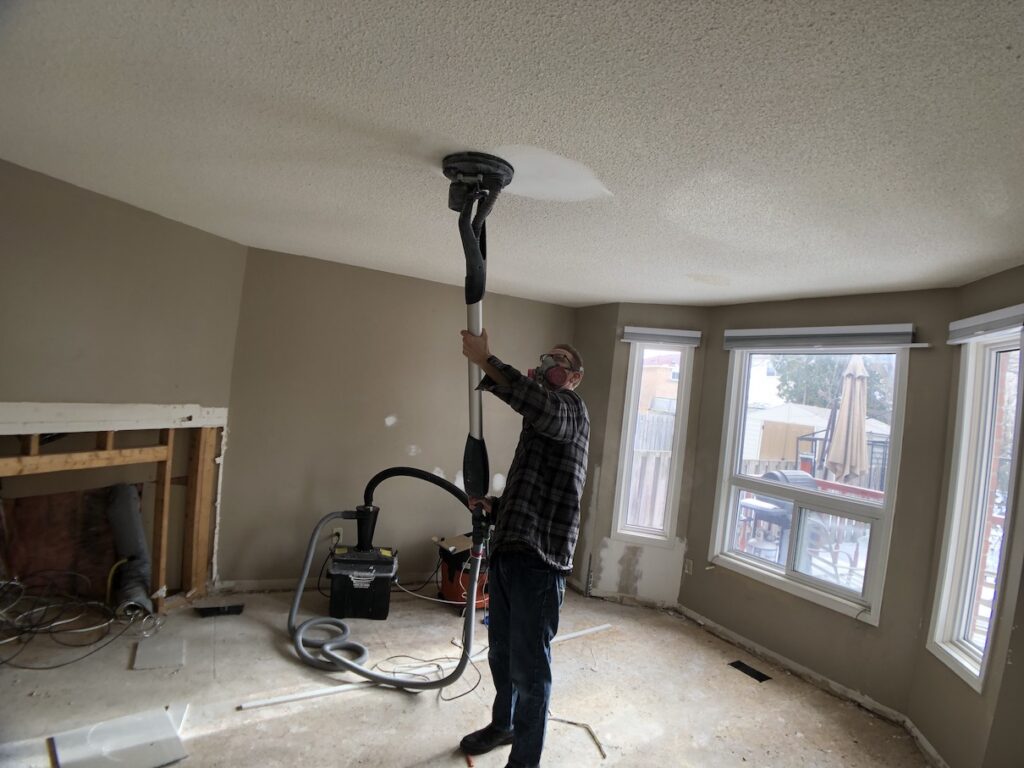
To start the removal process, wet small sections of the popcorn ceiling with warm water. This allows the water to penetrate and loosen the texture. Once the texture is wet, use a wide putty knife or scraping tool to gently scrape away the popcorn texture, making sure not to damage the ceiling surface underneath. If needed, you can skim-coat the entire ceiling with a joint compound to achieve a smooth finish. Afterward, sand, prime, and paint as desired. Working in small sections makes the removal process more manageable and efficient. If dry scraping isn’t successful, consider alternative removal methods like ceiling drywall installation.
Tips to Prevent Damage and Ensure a Smooth Finish
To prevent any damage and achieve a smooth finish when removing popcorn ceilings, there are a few important tips to keep in mind. First, protect your furniture and walls by using plastic sheeting and painter’s tape. It’s also crucial to test for asbestos fibers before starting the removal process to ensure your safety. Wet scraping is an effective method to loosen the popcorn texture, and using a joint compound will help smooth the surface after removal. Lastly, don’t forget to apply a fresh coat of paint for a smooth, finished look.
Alternatives to DIY Removal: Hiring a Professional
If you’re not up for tackling popcorn ceiling removal as a DIY project, hiring a professional is a great alternative. Not only does it ensure a safe removal process, especially for ceilings containing asbestos, but professionals also come equipped with the necessary experience and tools to handle the job efficiently. They can even take care of asbestos testing, if needed, and follow all the necessary precautions. By hiring a professional, you’ll be saving time and effort, allowing you to focus on other tasks while they get the job done. Plus, professionals can provide a smooth finish that matches your desired ceiling texture.
What if You Decided to Cover Up Your Popcorn Ceiling Instead?
Considering covering up your popcorn ceiling instead? It’s a creative way to achieve a smooth finish. Add crown molding for an elegant design or install tin tiles or textured wallpaper for a decorative touch. Skim coating can be done if your ceiling is in good condition. Hiring a professional ensures a smooth finish.
Conclusion
Removing popcorn ceilings can transform the look and feel of your space, creating a clean and modern aesthetic. Whether you choose to DIY the removal or hire a professional, it’s important to assess the condition of your ceiling and take necessary precautions to ensure a smooth and safe process. If you’re unsure about the presence of asbestos in your popcorn ceiling, be sure to test it before starting any removal. Alternatively, if you prefer not to remove the popcorn texture, there are options available to cover it up and still achieve a smooth ceiling look. Whichever route you decide to take, remember that a smooth ceiling can greatly enhance the overall appearance and value of your home.